I’m still here!

I know I haven’t posted since January, but I am still here. We’ve been busy with more renovations and I never seem to find time to do anything worth blogging about. I’m hoping to do more over the coming months so stay tuned!

Oh, and that Mora 164? It took a while to get it properly sharp but it works really well now.


Mora 106 and 164 Knife Review

A couple of weeks ago I received a Morakniv 106 straight knife and a 164 hook knife from my lovely wife as a Christmas present.

I wanted to wait a few weeks and give them a good workout before reviewing them, I’m not a fan of reviews that read “So I got this an hour ago and so far it’s not broken”. I wanted to see how they held up after they had been used, blunted, sharpened again, hung in the shed while it was raining etc.

Let’s have a look at the 106 first. I got it on the recommendation of noted carver Robin Wood (see this post).

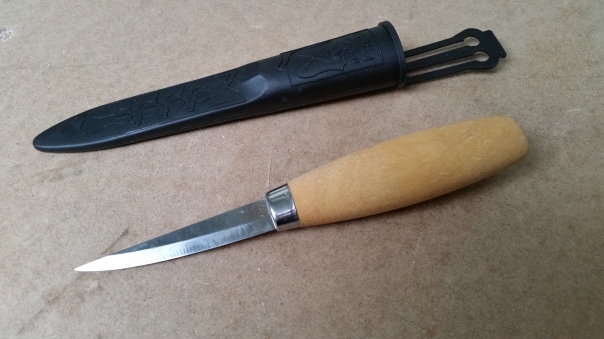
The picture above shows the knife and the plastic sheath it comes with. The blade is about 8cm long and it does have a few surface imperfections but they are behind the edge and don’t cause any problems. The handle is birch and while not sanded perfectly smooth it only took a few days for the oiled finish to start to feel good. The ferrule is fit well, and the overall quality for the price seems really good.

The first thing I noticed was how sharp it was. It was more than razor sharp, or maybe I just need to invest in better razors so I can do a proper comparison.

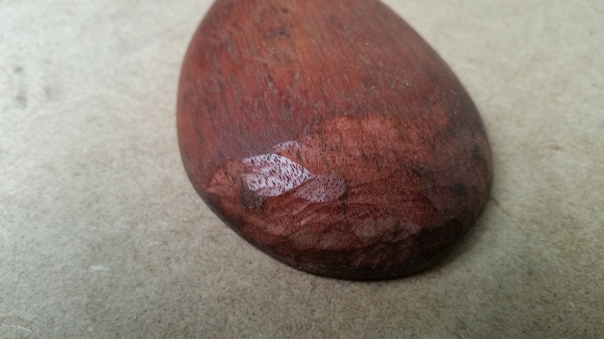
I’ve got a couple of Pfeil knives and out of the box they never left a polished finish on the wood like this one did. You can see in the below picture how cleanly it cuts. That’s Tasmanian Oak, which is pretty hard, yet it goes through it with about as much force as it takes to peel a carrot – which yes, I did try with this knife as well. Don’t tell my wife!

I decided that the real test was to see how it went on the toughest timber I could find, which was the end grain on some Australian Jarrah. It did take a bit more effort than the Tasmanian Oak did but still was far less work than any other knife I’ve used. You can see that it left a nice clean finish on the surface.

I’ve done 10 or 12 hours carving with it now, from a couple of spoons to a tiny fish to a new axe handle and it’s not needed anything more than a quick strop to maintain the edge. It’s actually getting sharper each time as I polish out the few grind marks that were on the edge. I’m really happy with it so far and understand why so many carvers recommend this knife.

It’s not going to take huge chucks of wood in one go, that’s what an axe or a drawknife are for, but it does handle pretty much everything I threw at it. I’d highly recommend it and hope to try the shorter 120 at some point.

Next up is the 164. It’s a hook knife designed to carve concave surfaces like the bowl of a spoon. It’s also really hard to photograph as it kept rolling back to this position on my bench.

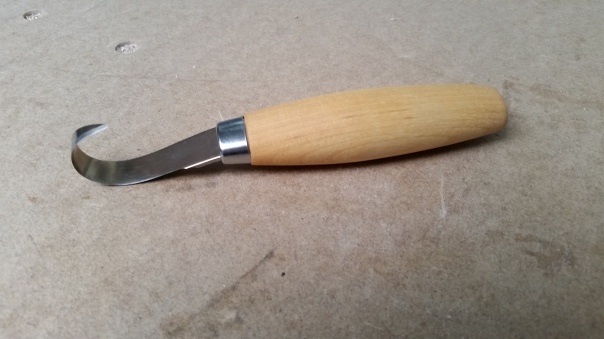
It’s got the same size and type of handle as the 106, and the same ferrule. On the one I received the ferrule isn’t seated quite right on one side. It’s not impacting it in use but it does show a lack of attention to quality control I didn’t see on the 106.

I wish that was the only problem I had to talk about. Every review I’d read of this knife said they came dangerously blunt and this one was no exception. Trying to take even a shallow cut required a lot of force and didn’t leave a good finish.

The blade is quite nice on it, but it’s a different grind to the 106, more like a chisel where there’s only a bevel on the outside. I set to work on it and it took a good hour to get it to the point where it started to cut cleanly.

It’s getting better each time I use it because I’m giving it a little more sharpening each time but it was pretty horrible out of the box. I knew it was going to be and understood that when I asked for it knowing that for the price I’d have to do some work on it, but I don’t know how they got the 106 so good and this so wrong at around the same price point.

I’m going to revisit this review in a few months and let you know what my thoughts are then. I need some more time with it but I can confirm that all the reviews that said they come blunt were right and if I hadn’t already had the equipment and skill to sharpen it I’m not sure it would have been usable.

There you have it, one brilliant knife and one I’m not sure about yet. Back to carving for me now!

Do you want to build a snowman?

I found this guy in my scrap pile from a couple of years ago so finished him off sitting on the back steps in the shade on a recent hot day. I’m glad he didn’t melt!

I used a knife for most of the work then a small gouge for the details. The eyes, nose and buttons were done with a nail punch.

he’s had a rough coat of paint but needs another and the lines around the hat tidied up. Then he’ll get some twig arms and hopefully a place on the tree this year!

Building a Jigsaw Table

Let me say it. I’m scared of table saws. I’ve had two old ones at some point or other, neither with blade guards, and they were the first things to go as soon as I need more room. I don’t even like using a circular saw.

I happened to find Stumpy Nubs book about building your own workshop machines at my local library though and in it he built a table to hold his jigsaw. I thought to myself that it could be useful, and since it has a guard over the blade it should be OK so I set about making one. Most of the timber is from the dismantled scroll saw table so it’s a bit damaged but is fine for workshop use.

I originally planned to have the jigsaw go this way, giving me a longer table for rip cuts but it wouldn’t fit on my bench in use so I changed it around

I attached four short legs to it, just long enough to elevate the jigsaw clear of my workbench but not so high as to make it hard to use

I cut the slot for the jigsaw and mounted it underneath with screws through the existing guide fence holes and a piece of wood over the back to hold it. I also had to cut a section of the back rail out to allow the vent port to go through it


I added a simple adjustable arm with a wingnut and a piece of PVC to go over the blade so it wasn’t all exposed

I ended up having to change the arm configuration as it kept vibrating loose, now it has two bolts and the actual arm has longer screws in it as well as glue. I also made a fence for it so I can do rip cuts.

It’s great in use. The bar at the front is so I can clamp it to my bench, otherwise it vibrates too much. The jigsaw isn’t mounted quite straight to the fence so I need to adjust that but I’ve already used it quite a lot with good results. The blade is a t-shank style so I can easily swap them without effort but the top does lift out if needed.

While I do have a scrollsaw, the heavier jigsaw blades work much better for some jobs. The don’t deflect as much as I’d expect but I may change the guard so there’s support at the back to stop any pressure on the blade moving it.

I’m really happy with this project and it doesn’t take a lot of space either.

The new workshop takes shape

The work to turn the shed into a workshop has basically taken two phases. The first was “Build shed, dump everything in there so we can park in the garage”. I left myself room to get the mower in and out and that was about as much time as I spent in there. There was just so many other things to do around the house and yard.

The second started 18 months later when we started renovating our bathrooms. We removed two old but intact vanity units. The actual cabinet part was in decent shape so I added some extra framing around the inside and cut some MDF tops for them and added casters.

That gave me two solid, mobile workbenches with a lot of inbuilt storage which has formed the basis for getting the workshop in shape.

I managed to get them into the shed, but it still left it in a bit of a mess – that’s an understatement I know!

Once I had time, I started to sort it out. I started by hanging up my old pegboard, then my chisel cabinet and plane tills. That got some of the mess off the floor. I’m not showing you the other side of the room though as it looks just like the top picture compressed into half the space!

Every weekend I did a little bit more. I got all the old scraps of pegboard up, rebuilt my saw till to fit, and added some shelves.

Clamps occupy one whole wall on the right, and on the left is my portable bench with a chunk of MDF sitting on top being used as a sorting bench while I keep cleaning the rest of it.

There’s still a lot to be done, but at least it’s usable now and I can start doing some projects.

A second toolbox

Another project from a couple of months ago that I haven’t written about until now.

I had a lot of fun building the long toolbox from a few posts ago, it’s the first time I’d build anything since moving. I decided I could have made it slightly differently though so had another go at it.

I decided I wanted it to be shorted, and to have a drawer underneath for a couple of hand planes and some chisels.

The timber that was left was a bit more warped than the other lot but I just wanted to use whatever I had left so it ended up a bit messy looking.

Once it was puttied and sanded back it looked better but I decided that a clear finish wasn’t the best way to go given all the patching

We still had some undercoat leftover from the renovations so I gave it a couple of coats. I used a trick I read about where you put vasoline where you want it to look worn

I’d originally planned to do a full height drawer but didn’t have enough of the right timber so settled for one with about 5mm clearance at the top. I pre-drilled the nail holes and then glued it up, and drove the nails in to clamp it.

Here it is with the drawer fitted and some handles and latches added. It will need some paint but it’s good enough for now. The only problem is the weight, once loaded up it’s pretty heavy!

It got used heavily when finishing the renovations though and held up really well. Simple design, rough joinery but it does what it’s meant to do!

Workshop Tetris

You know Tetris, that game with the falling blocks? If you don’t put them into neat rows they just keep filling the screen? That’s how my workshop has felt lately.

As frequent readers know, I downsized from a shared garage to a decent size garden shed, and I tried to cram everything from one into the other.  In addition to that I salvaged the old bathroom vanity cabinets from the recent renovations to use as workbenches so it was even more crowded. I really wanted all my machines set up and ready to use but it just wasn’t working out.

The solution to the workshop was the same as it is in Tetris – you have to get rid of some of the blocks to make room for the others to fit. While I was sad to do it, I pulled my scrollsaw stand apart, and the drill press stand is next. I’ve moved the drill press to the smaller of the new workbenches and the scroll saw is under the bench in the cupboards until needed along with my bench grinders. I don’t use them all the time and it’s not hard to get them out as needed.

I’ll post photos as soon as I can get a clear shot of it all!


Scrap wood tool tote

Last post I mentioned that we are in the middle of renovations. That’s meant carrying lots of tools and supplies around the house. Most of the time it’s meant me with my arms full of stuff dropping it, picking it up, dropping it again…you get the idea.

I got fed up with this so had a look at the local hardware store for something cheap to solve the problem but didn’t find anything I liked, so took a couple of hours weekend before last to make up a simple tool tote.

I just used whatever I had cut already to size the toolbox and did a test layout

One of the pieces already had some marks from when it was part of a shelving unit so I used them to lay out the sides and cut them out with my jigsaw and a scrolling bit

It took about 2 1/2 hours to get it finished, including sanding, but a good half of that was trying to find tools in the mess of the workshop. I’m pretty happy with the result.

The New Workshop

It’s been a long time since I posted. We moved house in early 2016 and there’s been so much to do in the new place that I haven’t even got my workshop set up properly yet.

A lot of stuff is still in boxes and I’ve just grabbed out stuff as needed for renovations and repairs. Everything’s a bit of a mess to be honest.

The garage in the new place is a lot smaller so we built a shed to use as a workshop instead. Here’s a pic of the inside just after it was built and I moved my stuff in

It’s 3m x 2.4m, so not huge but it does the job and I don’t need to pack it all up to bring the car in when I’m finished either.

We’re currently in the middle of bathroom renovations so I’ve saved one old vanity unit already when it was pulled out and turned it into a workbench, and I’ll save the other this weekend to use as well. No point wasting good cupboards when some castors and an MDF top can make them useful still.

In the meantime I’m having a ton of trouble buying pegboard. Everywhere locally is sold out so I can’t get it up and my tools on the walls. Hopefully I’ll find some soon and get that done too and actually get back to making things.

I’m still here

I know it’s been a long time since I had a new post but it’s a long time since I’ve done any woodwork too. We moved house earlier in the year and all my free time has been spent working on getting it set up. Having a much bigger garden to tend to is adding to that but is also rewarding in it’s own way.

I’ve got photos of the shed being built and my workshop semi-set up to come as soon as I can